Monday 30 November 2015

Crafty Christmas Advent

This year we're going to do a crafty Christmas advent, mainly because the Lego advent calendar we did last year have all sold out in the shops and they cost a fortune £25 each!
So using our family advent calendar I decided to do some kids craft fun instead.

Each day is a simple new craft. Here is my list for each day.
1. Letter to Santa - Made my own personalised design in word. Then we posted them to the special royal mail address so we should get a reply
(Cost 63p for the stamp.)
2. Clay Decorations. - we've invited a couple of school friends over for tea to help us make these (Cost £5 for the air dry clay)
3. Christmas Cards - simple homemade cards are the best kind for friends and family. (Cost £1 for blank cards and envelopes)
4. Snow flakes - I've pre cut these for the girls to glitter up. Then we'll hang them from the ceiling in their room. (Cost free as we're using bits we already have)
5. Christmas sticker book - we're going to be busy this day so a nice on the go craft we can take in the car. (Cost £1 from pound shop)
6. Mini cardboard tree - precut designs the girls can decorate. ( Cost free. Using old box and existing crafty bits)
7. Tree bunting. - felt tree shapes with stickers. (Cost £1.50 for the bunting and £1 for the stickers)
8. Angel hangers. Paper decorated angels. (Cost free as using crafty bits we have around the house)
9. Glitter pine cones. (Cost free. Cones collected from friends garden and who doesn't have glitter glue!)
10. Grow your own candy cane. - very excited about this one. More to follow!
11. Christmas activity book. - another busy day, another on the go craft. ( Cost free as she was given this last year and didn't get around to doing the pages)
12. Moveable frozen characters. - Were going to put on a show with these ones. ( Cost £1 from pound shop)
13. Snow flake dream catchers. - A craft to do when Aunty Sarah is babysitting. (Cost £1 each from hobby craft)
14. Toilet roll Santa. Pre cut sticky back paper shapes onto toilet rolls. With led candles will make nice little lanterns. ( Cost free)
15. Paper plate snowmen. Cotton wool on paper plates nice and easy. (Cost £2 for plates, wool and stickers)
16. Christmas colouring in. So free prints to keep little ones quiet. ( Cost free)
17. Potato stamp baulbals. This is potato stamps made from Christmas cookie cutters. These will make nice pictures for the girls RM ( Cost free)
18. Mince pies.
19. Reindeer food. Bird food and glitter all put in a little bag.
20. Hanging heart Decorations.
21. Ginger bread house.
22. Frozen fuzzy felt scene. (Cost £1 from poundland)
23. Tealight holder. (£1 from hobby craft)
24. Olaf build a snowman (£1 poundland)

Each craft is wrapped for extra excitement. 

Wednesday 25 November 2015

Tot Friendly Christmas Tree

Today is the 1st December so I can finally share with you all my Christmas crafts!

This year I needed to think outside the box when it comes to Christmas decorations as Millie is 16 months old. She's a walking and climbing whirlwind of destruction and chaos, which means your traditional tree is totally out of the question. It would be no time before she would have taken off all the decorations, and pulled the entire thing down on herself.

I'd seen these felt Christmas trees online and in hobby craft so I decided to have a go at my own. This was much cheaper than buying the premade ones. I bought the 2m x 1.5m roll of green felt off ebay for £5 delivered, and all the extra felt and lights from the local pound shop. Overall this has only cost me £17. Much cheaper than a tree anyway.

I cut out basic felt shapes for decorations and stuck them together with a hot glue gun. I then added Velcro dots to the back of the decorations and the Christmas tree cut out. This will allow the girls to take off the decorations and re arrange them as they please.

I then added some twinkly lights to the felt tree. I bought the battery operated copper wire lights which are safe enough (not plugged into the mains) and tiny enough to not add too much weight to the tree. I cut a little hold in the felt, hot glued the first bulb in place, then worked my way down the tree.
This is the back of the tree where you can see the light wire.

This is how the front looks.

I then hung the tree on the wall using blue tac and it seems to be sticking quite well. The girls are having fun with it already!

 And what have we done with our normal decorations?? I still wanted to show them off as they are so pretty. So I've done this around all of the windows too. A branch from outside, Hung the decs off the branch using different ribbons and wrap around with lights. WAY out of Millie's reach!


Thursday 5 November 2015

Bonfire Night Crafts

Fireworks night is one of my favourite celebrations of the year. It always brings back fond family memories and we always make the effort to go to a display, whatever the weather.

Scarlett has been off school sick for the past couple of days but thankfully has recovered in time this year to go to the village display.

So to keep her busy this morning we made a couple of crafts to celebrate the event.

Firstly we made a lantern to help light the way on the dark damp walk to the fireworks. These are fun and practical. They also save you from having to pay out for one of those crappy flashing light toys they always flog at these events.

Firework Rocket Lantern


So to make the lantern you will need the following:

  • Clear plastic tube, I used a tennis ball tube.
  • Battery powered fairy lights or torch
  • Stickers
  • Sparkly things
  • Ribbon/ create paper
So this is really simple. I let Scarlett pick as many bits out of the craft box she liked to fill her tube.


We then tied together different lengths of colour ribbon. I pierced a hole in the lid and fed the ribbon though. I then sellotaped it to the inside of the lid. 

Scarlett then covered the tube in stickers...lots of stickers. 

Lastly we put the lights into the tube, put the lid on and we were done. This was great as Scarlett did most of this herself and was very happy with the finished product. 


Our second craft was indoor sparklers. Safe, colourful and fun.
You will need:
  • Scraps of foil, ribbon and coloured paper
  • Straws
Firstly cut a slit into one end of the straw. Place strips of foil, plastic, ribbon and paper into the slit. Seal the slit with tap, securing the sparkles. Millie was a fan of waving these about. The foil makes a nice crackling sound a bit like sparklers too.


Tuesday 3 November 2015

DIY Dolls House

This has been by far one of my favourite craft projects so far!

I have decided to make a dolls house for the girls as a joint Christmas present. Its not totally DIY as I did buy the basic shell. I bought this really large basic Dolls House from ToysRus. It's super cheap at £50 for a wooden house with accessories and figures. But it's plain and boring...hence the price.

Cute toilet before make over

So if you fancy giving it a go, this is how I did the girls one on a super tight budget.

Firstly I painted the house parts before assembling it. Its much easier to paint before screwing it together. I used a some left over matt paint for the exterior walls and added white gloss to the raised areas for definition. I painted the door in a slightly darker blue to the walls just so it stood out.

Secondly I managed to decorate the entire interior walls and floors for free...how?
I searched the internet for a few hours and ordered every free sample of wall papers I could. Most major shops do free samples with free shipping, next, john lewis, homebase ect, but lots of high end designers do them too. The living room wall paper would be over £100 per roll to buy, but I got a large A4 sample for free. You also get the free sample rolls in most DIY shops, I just visited one and took some free strips. I used wood effect wall paper to create wooden flooring in the dolls house too.

I had to wait a couple of weeks for them all to arrive but once they did I got cracking.

Lastly the finishing touches. I used a home catalogue and cut out pictures of photos in frames to sick on the walls, fire place photos, mirrors, lights, plants. Once they were all stuck on they added character to the rooms.

So here are the finished rooms.

This is the master bedroom. This is wall paper glued to the walls and floor. Note the added picture on the wall of a rose from a catalogue of home décor.
I also covered the bed with a scrap of material and made a new bedding set.


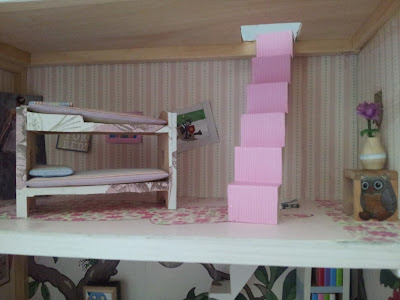
The kids bedroom .I used wall paper on the walls and floors again here. I also cut out some kids cartoon pictures from a kids magazine to show it as a kids room. I added coloured paper to the stairs to add extra colour.

This is the living room with the super expensive wall paper. I've use the wood effect paper in here to look a bit like wooden flooring also.
You can see some of the added details here with the photos hanging on the wall, the fireplace and the clock. These were all taken out of a home style magazine.


Next my favourite room. The toilet. But mostly because I managed to find this awesome wall paper. I think this was from a DIY shop, which I took from the free sample roll.


This is the kitchen, again this was an expensive wall paper which I love. I pained the kitchen appliances and put some silver wall paper onto the pretend fridge. I also added some pictures of kitchen house decor stuff like the chalk boards on the left and house rules on the right.


Lastly here's mum in the dinning room, with a drink. I tried to make this as realistic as possible after all. I used fabric on the floor here to create a carpet feel and another square of carpet for a rug


Overall this is now a fun, colourful and hopefully something they will have fun with and play with for a long time. Plus if /when anything gets inevitably damaged, it doesn't matter..we can just re decorate.


Sunday 1 November 2015

Cress Heads

This is a great penny pinching home craft for the little ones.


The kids enjoy getting messy making them, lots of stickers decorating them, then watching them grow. The best bit is they grow super quick for those impatient kiddies who tend to loose interest if they can't almost see something growing before their very eyes. These only take a week or so to mature so are perfect.

So here is how:

  1. Cut up an old pair of tights around the ankles.
  2. Pour a few cress seeds into the toe part of the foot.
  3. Top with soil and tie up end. (for the daddy pour a few extra seeds in around the top of your soil to create a beard before you tie up)
  4. Turn upside down onto the tied up end.
  5. Decorate with stickers. We did a mummy, daddy and Scarlett. 
  6. Place into little dishes to collect water.
  7. Water thoroughly at first, then just pour water into the dishes when they start to feel dry.
  8. Watch them grow.
  9. When shoots appear to be trying to break through the tights, cut a small hole to let them through
  10. Add to salads and sandwiches when you want to give them a hair cut.
Day 1


Day 3
You can see the shoots coming through. 

Day 7