I have decided to make a dolls house for the girls as a joint Christmas present. Its not totally DIY as I did buy the basic shell. I bought this really large basic Dolls House from ToysRus. It's super cheap at £50 for a wooden house with accessories and figures. But it's plain and boring...hence the price.
 |
| Cute toilet before make over |
So if you fancy giving it a go, this is how I did the girls one on a super tight budget.
Firstly I painted the house parts before assembling it. Its much easier to paint before screwing it together. I used a some left over matt paint for the exterior walls and added white gloss to the raised areas for definition. I painted the door in a slightly darker blue to the walls just so it stood out.
Secondly I managed to decorate the entire interior walls and floors for free...how?
I searched the internet for a few hours and ordered every free sample of wall papers I could. Most major shops do free samples with free shipping, next, john lewis, homebase ect, but lots of high end designers do them too. The living room wall paper would be over £100 per roll to buy, but I got a large A4 sample for free. You also get the free sample rolls in most DIY shops, I just visited one and took some free strips. I used wood effect wall paper to create wooden flooring in the dolls house too.
I had to wait a couple of weeks for them all to arrive but once they did I got cracking.
Lastly the finishing touches. I used a home catalogue and cut out pictures of photos in frames to sick on the walls, fire place photos, mirrors, lights, plants. Once they were all stuck on they added character to the rooms.
So here are the finished rooms.
 This is the master bedroom. This is wall paper glued to the walls and floor. Note the added picture on the wall of a rose from a catalogue of home décor.
I also covered the bed with a scrap of material and made a new bedding set.
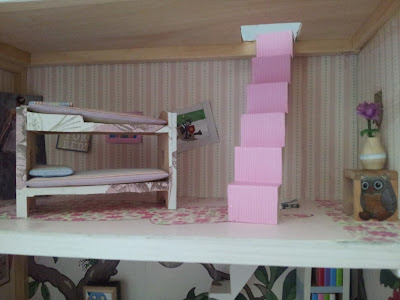
The kids bedroom .I used wall paper on the walls and floors again here. I also cut out some kids cartoon pictures from a kids magazine to show it as a kids room. I added coloured paper to the stairs to add extra colour.
This is the living room with the super expensive wall paper. I've use the wood effect paper in here to look a bit like wooden flooring also.
You can see some of the added details here with the photos hanging on the wall, the fireplace and the clock. These were all taken out of a home style magazine.

Next my favourite room. The toilet. But mostly because I managed to find this awesome wall paper. I think this was from a DIY shop, which I took from the free sample roll.

This is the kitchen, again this was an expensive wall paper which I love. I pained the kitchen appliances and put some silver wall paper onto the pretend fridge. I also added some pictures of kitchen house decor stuff like the chalk boards on the left and house rules on the right.
Lastly here's mum in the dinning room, with a drink. I tried to make this as realistic as possible after all. I used fabric on the floor here to create a carpet feel and another square of carpet for a rug
Overall this is now a fun, colourful and hopefully something they will have fun with and play with for a long time. Plus if /when anything gets inevitably damaged, it doesn't matter..we can just re decorate.


No comments:
Post a Comment